Are your students having trouble getting audio files on your blog to play on their computers at home? You will find a detailed post on my school blog: http://blog109.org/communities/kiplingmusic/archive/2008/05/22/33456.aspx
If you are a Firefox user (if not, it is worth investigating!!!!) you can easily add plugins by visiting https://addons.mozilla.org/en-US/firefox/browse/type:7
FYI - Plugins allow your browser to display various graphic formats and play multimedia files.
Friday, November 28, 2008
Music K-8 KidTunes
Many music teachers subscribe to the Music K-8 magazine, published by Plank Road. This wonderful resource includes teacher tips as well as a huge variety of original songs - including seasonal songs and songs for recorder and boomwhackers - that kids absolutely love! These songs are now available for download in a format similar to iTunes. Parents set up accounts for their children and kids can select and download songs to play on their computer or MP3 player. Avoid the temptation of posting Music K-8 audio files to your blog or website - send your students to K8 KidTunes instead. The composers/publishers will get the credit they deserve as we model for our students the importance of following copyright laws.
Client Services
Looking for more than helpful hints? Do you want a website but want someone to set it up for you? Here is a website I created for a local children's author using RapidWeaver (Mac software). After developing and publishing her site, I taught Mary to maintain and update it herself.
HTML Tip #2 - Embedded YouTube Video
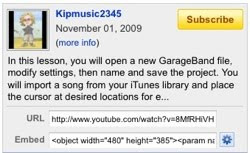
There are many wonderful videos on YouTube that can be used in the music classroom. Whether you are comparing different performances of the same piece, exploring instruments and voices, or investigating unusual instruments, there are many YouTube videos that will correlate to your curriculum. The problem is that you never know what else will show up in that window when you play the video for your students. Solution: embed the video on your blog or website. Not only will you have control over content your students will see, but they can find everything in one location - your blog or website!
Once you have selected the video you want to use in your lesson, it's time to open the "embed" box in the upper right corner of the window on YouTube.
Next, click on the "customize" button to select the size, color and other settings for your player.
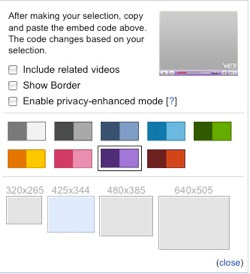 When the next window opens you see several options for player size and color. You can also choose whether or not to include related videos - I always un-check that box. If your students click on one of the related videos then all of ITS related videos pop up. So much for controlling the content your students will see!
Once you've chosen your embedding options, copy the text from the embed field and paste it into your website or blog post.

Ta Da!
Once you have selected the video you want to use in your lesson, it's time to open the "embed" box in the upper right corner of the window on YouTube.

Next, click on the "customize" button
 to select the size, color and other settings for your player.
 When the next window opens you see several options for player size and color. You can also choose whether or not to include related videos - I always un-check that box. If your students click on one of the related videos then all of ITS related videos pop up. So much for controlling the content your students will see!
Once you've chosen your embedding options, copy the text from the embed field and paste it into your website or blog post.

Ta Da!
HTML Tip #1 - Link Tip
Don't let visitors leave your site! When you add a link to your website or blog, the default setting will likely open the new page in the same window. You don't want them to get distracted and not come back to you, so why not insert a teeny bit of code into your page? Here is what you want to add: target="_blank"
1. In editing mode, highlight the text for your link. This will help you find the corresponding information in HTML view.
2. Next, in your editing/compose window, click on something that says "Html."
3. Right after the URL (website address), type target="_blank"
This is what the html for a link to blogger.com would look like without the added code:
href="http://www.blogger.com/">blogger.com
Here it is with the added code:
href="http://www.blogger.com/" target="_blank">blogger.com
Ta Da!
Creating a Website
You might think that making a website would be much more difficult than a blog. While websites can be as simple or complex as you would like to make them, getting your first website published isn't as difficult as you might think. The first step is to find somewhere to host your site. Many school districts and Internet Service Providers provide web hosting services at little or no cost. I published my first website five years ago using TeacherWeb. For a modest yearly fee, all I had to do was type in my text and my website was launched. Through TeacherWeb, members are now able to easily write and publish WebQuests. While I have now moved on to a website I created using DreamWeaver, that TeacherWeb site got me started.
Update, 7/28/10: There are lots more Web site creation tools available now. You might consider:
Update, 7/28/10: There are lots more Web site creation tools available now. You might consider:
- Weebly: Free hosting, attractive templates, very user friendly.
- Googlesites: Allows for multiple administrators; very handy if you are creating the site with a colleague.
Creating a Classroom Blog
Creating a blog is quick and easy and provides a wonderful opportunity to share information with your students and their families. The first blog I created for my classroom was hosted through my school district (gone now) but blogs are easily created on sites like this one, blogger.com. When I began my classroom blog three years ago, my posts were sometimes few and far between but over time I came to find more and more opportunities to use my blog for communication. In the second year, I used my blog to post links to Internet resources used in class. Not only did this make it easy to access resources, but students could easily access them at home as well. Now in my third year as a teacher/blogger I continue to find new information to share with my students and their families through the blog. It has taken awhile, but my students are now beginning to actually make comments - that means the blog has developed into what it is intended to be: two-way communication!
Update: 7/28/10
My old blog is gone (host discontinued hosting) and I have a new district-hosted blog. Here's a link. Like many school sites, the template is one that is used district-wide (same colors, graphics, layout, etc.) and I just type in my content. If you like to play, many blog hosting sites, like Blogger, allow customization.
Subscribe to:
Posts (Atom)